Here's what I've been up to recently when it comes to clothing:
 - I've been looking for a very long time now for an overcoat with fur lapels, but I always buy vintage fur if I'm going to wear it, because I view that as recycling fur and after having read about the fur industry I find the idea of killing an animal without eating it abhorrent.
- This is the moment where I ought to make apologies to any professional tailors, who will probably cry at my lack of skill, but I won't, because I'm quite pleased with the finished product.
- Any of you who keep up to date with Dolce and Gabbana will know that wool overcoats with fur lapels are all in this winter (look to the right) and I've been trawling the internet for an overcoat in this style with contrast lapels. Sadly, I've been unable to find one and when the going gets tough - the tough get going, so I've decided to make one by merging two existing items together.
What I did:
1. I hopped on to Amazon and bought an overcoat.
- I went for a lower range one, because I know that if I'm going to end up altering it anyway, the overall quality of the build matters slightly less. Also, having four other coats anyway of varying thicknesses, the fabric quality is also less of an issue.
- I went for a slimmer fit overcoat, because I would have to do less tapering around the waist to make it look perfect when unbuttoned.
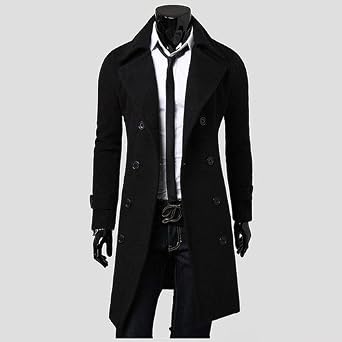
- In the end I bought this one to the left:
- The quality was higher than I was expecting, but for some reason it didn't come with a lower button hole (maybe this is a new style trend I've missed out on).

2. I needed some faux fur, so I went to:
http://www.fauxthrow.com/index.php
- I opted for a shawl collar that looks like this:
3. The sewing beings!
- I forgot to take pictures when I was doing it, so I'll give a quick explanation of what I did:
- Basically, I lined up the shawl collar with the existing collar of the coat and sewed it onto both sides of the lapels (not only does this hide my poor sewing skills, but it also meant that if in the future I wanted to remove it I would have the original item in an unaltered state.
- After this, I unpicked some of the lining around the back and took the coat in by about one inch on each seam around the waist.
The (almost) finished product:

- I still need to iron it, but after that it's basically done and dusted.
- Anyway, keep it cool until next time guys (and please forgive the untidiness of my room)!


No comments:
Post a Comment